Showing posts with label DIY. Show all posts

Sunday, September 04, 2011

Learning to sew


Well, learning is a stretch. Considering I haven't yet successfully threaded the bobbin (I don't really know what a bobbin is or if that makes sense). Considering, even after studying the instructions for about 30 minutes, I can't figure out how to get the machine threaded, I don't think this is going to be a very fruitful activity...

Friday, August 05, 2011

Filing solutions

The raw materials
After a few years of changing the subject every time MRN brought up our "filing system" (which admittedly wasn't often), I finally decided that it was time to address the problem head on. Well, that's not exactly true. The real story is that in a frenzy of looking for a ridiculous number of documents to prove all sort of ridiculous things for immigration purposes (mine and his) he finally put his foot down and insisted that if we didn't address the filing issue then he was going to go out and buy an ugly, metal vertical filing cabinet and put it in the office.

You can bet that kicked my bootie into high gear.

Not that I didn't agree that our "system" wasn't much of a system-- it was a series of expanding file boxes we got at various Ikea visits; so they didn't match and were not integrated... and there was duplication all over the place. But with the threat of ugly entering the house, I set out to find a better solution--err, compromise. I had found a "filing ottoman" at the Dormy House, but at a whopping £500, I wasn't about to spend that kind of cash. I mean-- what is it? Some plywood, some fabric-- how hard could it be? So an idea was born. And thankfully with a handy husband, it was also relatively painless.

It took MRN all of 15 minutes to build it (thanks to the cutting service at B&Q-- England's equivalent to Home Depot). Then the fun part of upholstering. Which wasn't fun at all-- what started as my project ended with me throwing my hands up and letting MRN take over (he can't help it... I'm the queen of get the project finished in the least amount of time and he's Mr. Detail get everything perfect when it comes to building anything). Our take-away? I'm the "idea man" and he's the "execution man." Fine by me!

Here's a step-by-step of our DIY filing ottoman. Still some finishing work (in terms of lining the inside), but functional and in use for the time being. MRN thinks we should sell them-- much better option than ugly metal filing cabinets, don't you think?

The goods:
  • Plywood
  • Foam
  • Quilt batting
  • 3 yards of striped fabric
  • Spray adhesive
  • Staple gun
  • Furniture legs
  • Hinges
  • Metal dowels
  • Cardboard
  • Satin ribbon
  • Upholstery nails 
The process:


A notice board/decorative touch on the inside cover made from thick poster board which I covered with the same fabric, satin ribbon and upholstery nails. The ribbon is a pretty close match to the color of the flowers in the wallpaper used to decorate Gladys (and the lampshade). Lucky purchase on my part considering I didn't bring a swatch to the fabric store. Whoop!

    Monday, August 01, 2011

    A little paint goes a long way

    Another make-over, this time of the mini variety. I found this planter at Tesco in the sale aisle for a whopping £2. Score! And while I love the natural terracotta with the olive branch decoration, I've been looking for a planter that we could put at MRN's dad's grave for a little while now. And since it will be outside permanently and you have to seal terracotta so it doesn't wick away all of the moisture and kill whatever is planted, I decided I would paint it.

    I started by sealing the inside with a clear enamel spray and then painted the whole thing using good old Rustoleum multi-surface spray paint in gloss black (yes, I used the same for Gladys).

    After 24 hours I then used a stencil brush to dab bronze metallic acrylic craft paint on the olive branch decoration which I purposefully did imperfectly to give is a more natural look. Another 24 hours later, I sealed the whole thing with more clear enamel spray paint.

    So, voila! Pretty simple transformation for a flower pot-- and at a bargain (since I had left-over rustoleum, I only had to buy the enamel and craft paint (£2.99 each). That plus the pot means this little project was only about £6. I always think it's such a shame to leave flowers that die so quickly and I'd noticed that some of the other graves had lovely gardens and planters-- so this way we can plant seasonal plants that could last a few months and there would always be something in bloom. I was too late this season for forget-me-nots so I got some beautiful begonias (not pictured) and as the season changes I figured we could replace with some heather or evergreen as it gets cold and then plant forget-me-nots and rosemary (for remembrance) in the Spring. Any other ideas of what we can plant as the seasons change?


    Spray-painted black


    Finished product

    Wednesday, June 29, 2011

    Gladys get a makeover

    So, we all know my English home's gots some storage is-sues. I've been sucking it up and making do; I hate clutter and having things on display, so I've become somewhat of an expert at maximizing storage (and shoving things where they can't be seen).

    My biggest challenge to date has been shoe storage. One day when I'm fabulously wealthy, I'll have one of those MTV cribs closets that are bigger than the average bedroom and has a whole wall of little cubbies to display—err, store shoes. But until then, I'm forced to get creative in my limited space.

    Enter Gladys.

    Gladys is a china cabinet I bought on eBay for £20 (that about $32). I don't know anything about her origin or age, but the seller was able to tell me that she came from an estate sale of the belongings of a woman named Gladys. Of course the name stuck. It's a classic-- like every good grandmother name (Matilda, Frances, Mildred...). It was, as they say, kismet. Small enough to not take up too much space; stylish enough to be on display; and big enough to house, oh, at least 15 -18 pairs of shoes.

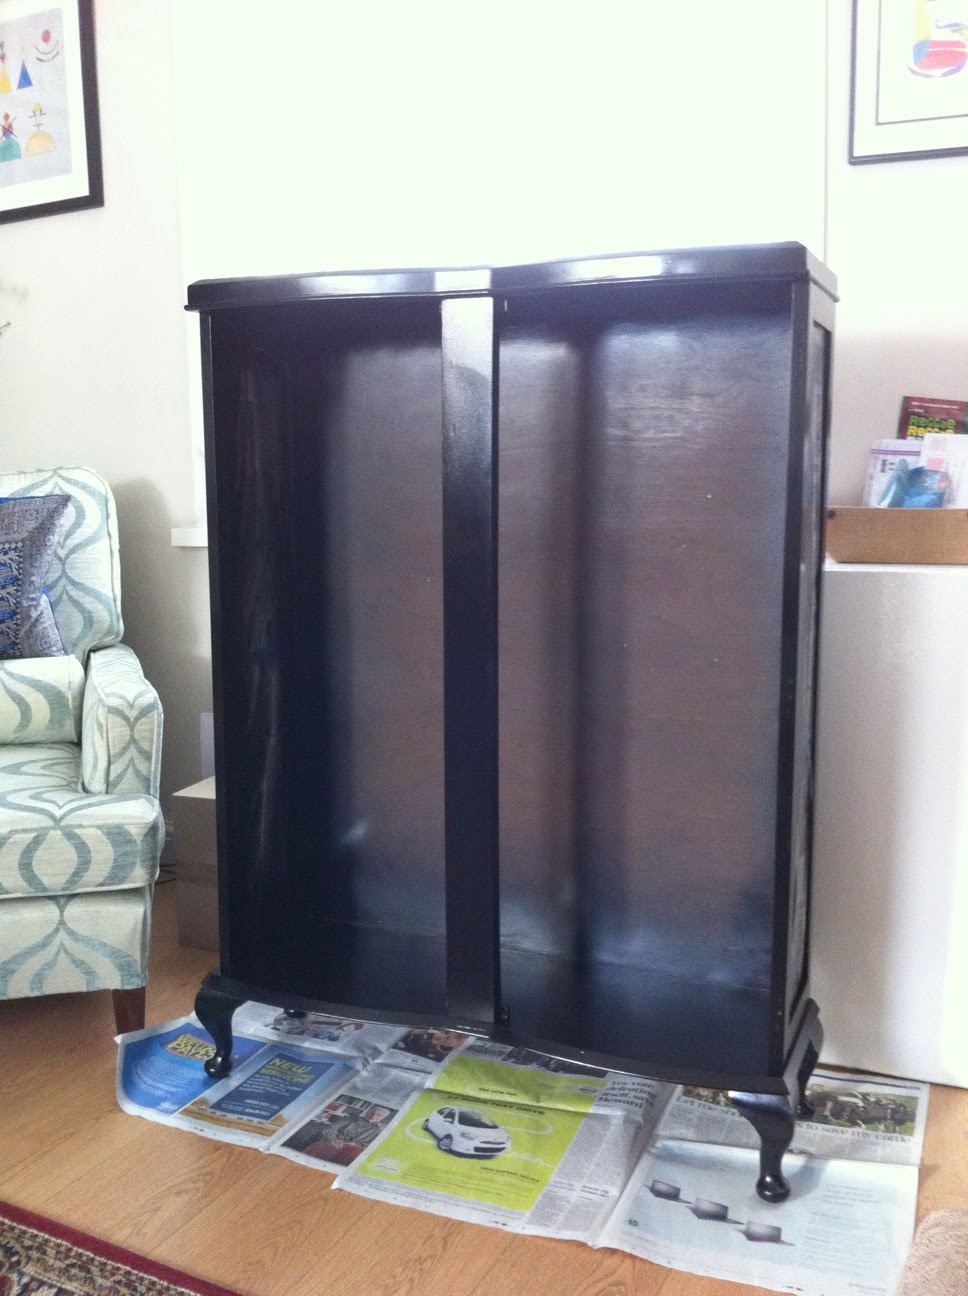
    Alas, while Gladys had great bones, the old girl was a bit of a wreck. Cracked and peeling, various layers and shades of stain, she was in need of an overhaul. After trolling the internet for inspiration, I decided that I would bite the bullet and apply a coat (or four) of glossy black paint-- 1) because I fell in love with all the makeovers I found online; 2) because she was a bit old fashioned for my taste and I felt like she deserved some sprucing up; 3) because I loved her curves, which reminded me of a piano; and 4) because I couldn't bear the time commitment of sanding, re-sanding and then more sanding it would take before I could apply stain (umm—so much for that; it required multiple rounds of sanding which, coupled with the dismal weather and not being able to do anything outside made this project drag on for about 4 months). Oh, and 5) because I had an idea that I could use the awesome Orla Kiely wallpaper I bought a few years ago for another project but never used.

    So, below is Gladys' journey from great to even more awesome (if I do say so myself). The wallpaper worked terrifically as a way to brighten up the dark interior and serve as a backdrop for my art-- err, shoes (and in fact, it’s a bit of a shame that the shoes cover it up). And the black gloss paint? LOVE. It really does make her look like a piano. Alas, my clodhoppers mean that only the high-high heels fit on the shelves straight on, but I've managed to get 18 pairs in there, so not too bad. I plead the 5th on how many pairs I have in total.

    Meet the original Gladys.


    Wednesday, February 23, 2011

    Sew-lusions of grandeur

    I'm thinking about taking a sewing class. It's not a new idea... I remember thinking about it way back when I lived in New York... and again in Chicago... even going so far as to try to find a class. You wouldn't believe how hard it is to find a sewing class. Home economics doesn't exist for the adult set, I guess. Maybe because we good girls should have taken Home Ec in junior high and high school when we were supposed to be learning about being good wives (I mean, 'cause come on-- even though my mother's generation liberated us, clearly the message wasn't passed down to the public education system who still offer Home Ec as a regular course selection). I took student government and AP classes like calculus and art history instead (of course)-- which I suppose was my way of turning my nose up at the domestic smothering that the public school system was trying to cram down my throat.

    However, now that I'm older and a tad more level headed, I realize that some of those skills might have been good to learn... like sewing. I mean, how often do you need to sew a button back on a coat, or hem a pair of pants... or sew patches/badges on a shirt (okay, maybe not so much the latter, but believe it or not, I actually have had the need to do that and it was not, shall we say, an optimal outcome). Plus, I have very happy memories of my full-time working mom making our Halloween costumes; Of field trips to the fabric store to flip through patterns to find just the right costumes. And I'm not talking run-of-the-mill ghosts made out of bed sheets. I'm talking about proper, better than you'd ever buy in a store, costumes. Clowns, Spiders, Watermelon slices (Aloha); Dorothy from the Wizard of Oz, Princesses and, errr... Princesses (Me). They were fantastic! She also made beautiful dresses for special occasions-- holidays, school plays. It was the best. She is the best.

    I've been thinking a lot about that; not only how it would be handy to do some repair work myself, but also actually be able to make something. Have you ever been in the situation where you have some event coming up and you have in your mind a picture of the perfect dress? Only you can't find anything to match what you've conjured up in your head? Imagine if you could just whip it up yourself?? I don't really have a passion for fashion in the haute couture kind of way. I do love me some Anthropologie and am a little obsessed with Rachel Zoe because she's bananas-- in every sense of the word (sorry couldn't resist). But a desire to design clothes? Not in the slightest. But lo and behold, a swift Internet search of sewing in Burnley turned up a 10-week adult education course at the local College. It seems a little excessive for my needs, but for 100 bucks (or pounds...) meaning 10 GBP per class, it's a pretty good deal. And if I do have a child one day, it would be pretty great if I could make their Halloween costumes from scratch and give them a memory that will always remind them of how much their mom loved them.

    Monday, November 09, 2009

    Newfound Love

    Before:


    After:


    The home renovation project continues, but there's definitely a light at the end of the tunnel. With the final big project finished (the office-- photos to come) now we're just doing all the little (annoying) jobs-- painting trim, touch-ups, organization, etc. Oh, don't get me wrong... there's still some construction to be had (the weird alcove over the stairs still needs shelves...), but for the most part, the major projects are done.

    The Problem:
    The LAST thing that needed to finished with the kitchen was the back of the cabinet unit that faced the living room. Since kitchen cabinets are meant to face walls, the backing is just hardboard. That means it's not easily painted (it takes multiple coats and still looks bad). Plus there were holes in multiple locations that are used to affix the cabinets to wall. So painting would only solve part of the problem. You see my dilemma.

    The Solution:
    After a year of pondering, I finally came up with the solution: Wallpaper. I found a great damask print from, of all places, B&Q (Home Depot's British brother) that complements our wall color. And in less than 30 minutes, we had the finished product. MRN finished it with iron-on edging and it looks like it was meant to be. Fantastic! (Not to mention, for my first time ever wallpapering-- and with a pattern that needed to be matched up no less on an uneven surface, I think I did a pretty admirable job).

    It's a shame that my media cabinet blocks most of the wallpaper. But now (much to MRN's dismay) I'm actively looking around the house for somewhere else I can wallpaper!